Custom actions are not available in the Essentials solution.
Only Tenant Admins can create and manage custom actions.
Some knowledge of PowerShell is required to create custom actions in CoreView.
Follow these steps to create a custom action:
Step 1: Manage custom actions list
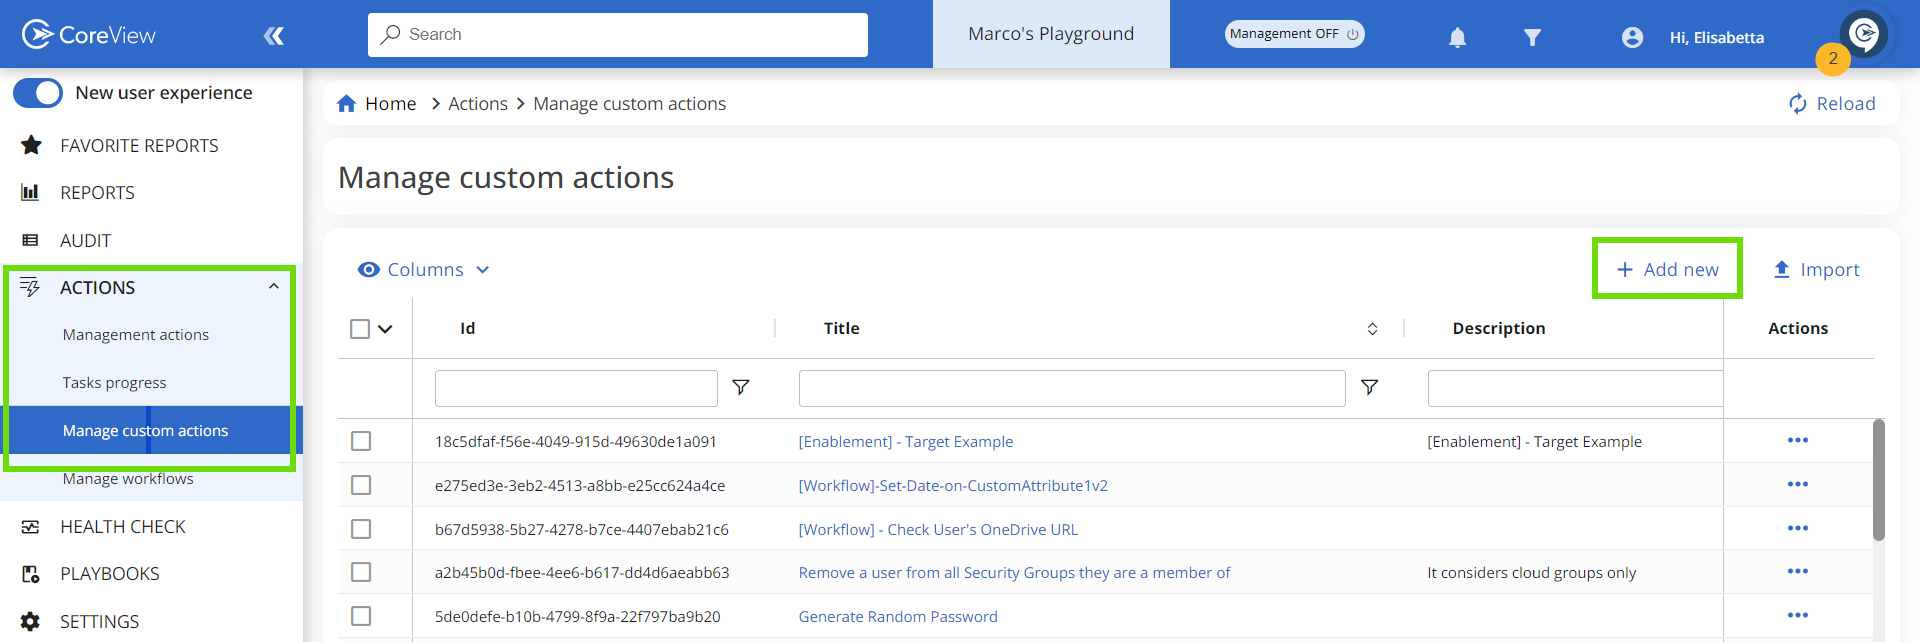
- Expand the “ACTIONS” section on the side panel menu.
- Click on “Manage custom actions”.
- Click “Add new”.

Step 2: Configuration wizard
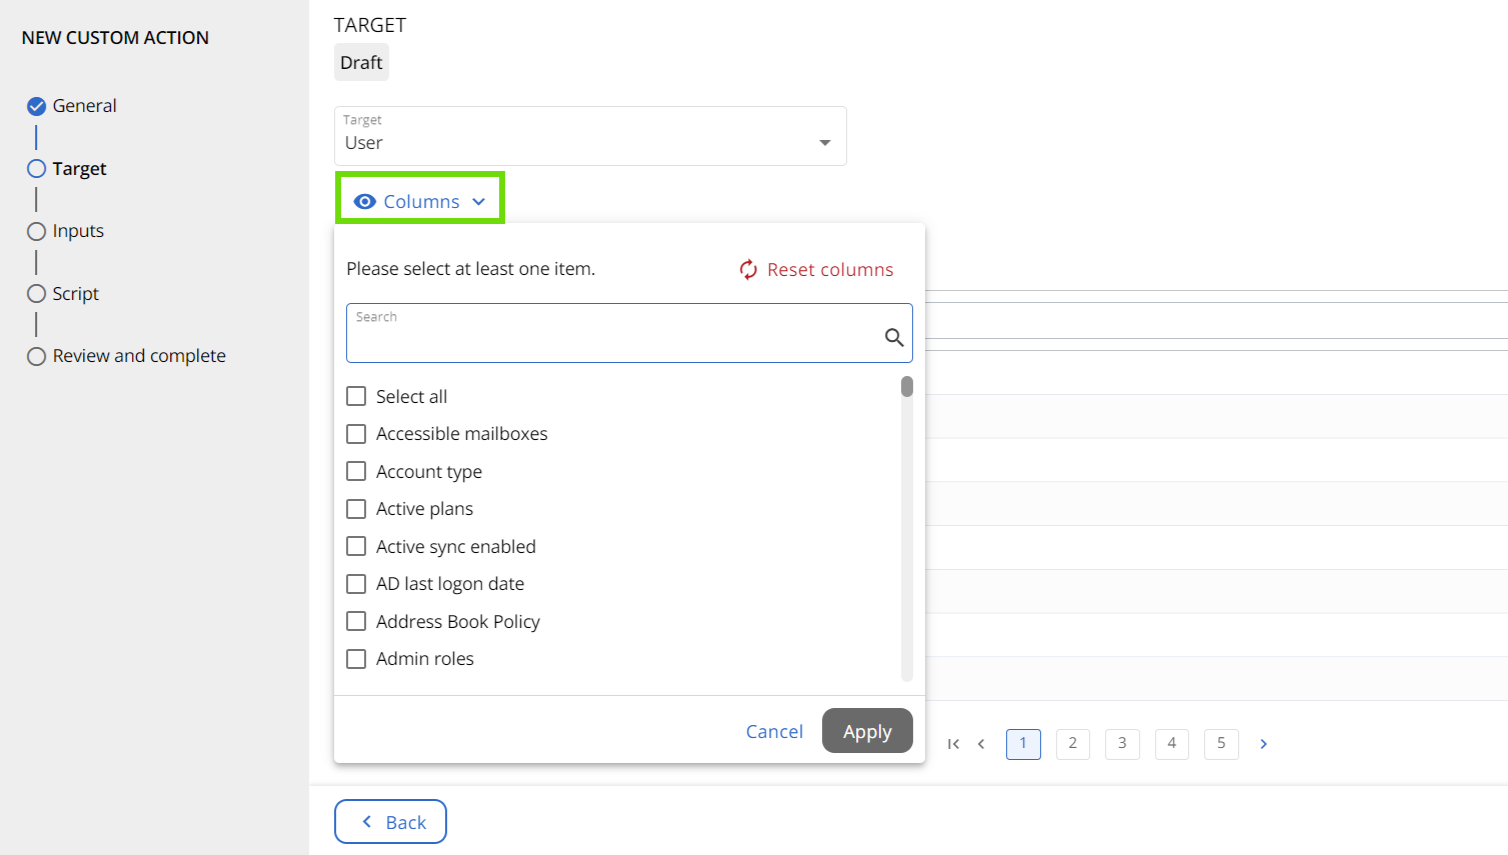
A wizard will appear guiding you through all the necessary steps to create a custom action. In the “Target” section, you have the option to define your custom action target. Select one of the available options from the drop-down menu.

Enterprise / Delegated Administration add-on
The Virtual Tenant is not applied on a target-free custom action (“None”). This means that the delegated operator that runs the custom action will be able to manipulate all objects.
If, for example, you select “User” as the target and the delegated operator is part of a V-tenant, they will only be able to manipulate items related to users based in the specific countries that the V-tenant allows.
After selecting a specific target, the system enables you to define variables related to that target. For instance, if “User” is the selected target, you could define variables such as the User Principal Name.
Step 3: Target tab
Once a target is selected, you can add columns to the table. These columns can be filtered by clicking on the textbox above them and choosing the desired filter to apply.

Operators can't modify the filters set by the Tenant Admin during custom action configuration.
Step 4: Input tab
In the “Input” tab, you can manage the variables. Add or delete them by clicking the icons next to their names. These variables will be automatically integrated into the PowerShell script.

Step 5: Script tab
In the “Script” tab, you must input your PowerShell script. Upon doing so, the parameters and variables will be automatically integrated into your script.
Before transferring the code from PowerShell to CoreView, it's necessary to delete the commands that open and close the sessions ($session - New-PSSession; Remove-PSSession) as well as import modules. CoreView manages these aspects automatically through its “Management Session” feature.
For additional tips and guidance on customizing your PowerShell script, you can view the Custom action cheat sheet.
Script Optimizer
The Script Optimizer is only available in the CoreView One solution.
The Script Optimizer functionality is not available for customers hosted in the GOV data center.
The Script Optimizer allows you to integrate AI capabilities into your PowerShell scripting process. It provides real-time feedback on your scripts, offering suggestions, improvements, and error guidance.
Features:
- Script evaluation and feedback: provides AI-generated insights to refine your PowerShell commands.
- Error guidance: delivers detailed explanations and potential solutions for scripting issues.
- Best practice recommendations: suggests enhancements for script security and performance based on industry standards.
- Interactive guidance: offers step-by-step support for troubleshooting and refining scripts.
Do you have concerns about the security of AI? Visit our article AI security and privacy overview.

To use the Script Optimizer:
- Input your PowerShell script in the “Script” area.
- The script will automatically appear in the “Generated Script” area.
- Click the “Optimize Script” button.
- The response from the AI will be generated, providing suggestions and improvements.
- Modify your script based on the suggestions.
Step 6: Management session
When executing a custom action, ensure that all the channels of the management session are connected; otherwise, the custom action will fail. Alternatively, you can specify the particular channel required for the custom action's execution.
For example, if a custom action only needs the “Exchange” channel, it is sufficient to insert the following tag into the PowerShell script:
<#
Exchange
#>
Here are the possible values for the tags:
ActiveDirectoryOnPremises
ExchangeOnPremises
MicrosoftTeams
SharePoint
MicrosoftGraph
For more information, please consult the article on the PowerShell versions and features supported by CoreView.
Step 7: Save and preview
You now have the option to save your work as a draft and run a preview of the action.
The preview feature is only available to the admin who creates the custom action.
Step 8: Submit for review
Once you're ready to submit the custom action, click the “Submit” button. Our team will then review it to ensure there are no security or performance impacts on the CoreView platform.

Please note that we may either approve or reject the custom action based on this review.
If approved, the status of the custom action will change to “Review approved”. You can check the state of your custom actions under the “State” column on the “Manage custom action” page.

Custom action notification
You will receive custom action notifications at the email address defined in “My profile > Personal info”. Admin profiles cannot be saved if the email field is missing or contains an invalid address.
Step 9: Publish
Once the state of your custom action changes to “Review approved”, simply click on the “…” under the “Actions” column and select “Publish”.
Consequently, the custom action will appear in the “Manage custom actions” list, ready for use within Workflows.
FAQs
Can I edit or delete a custom action?
At this stage, a custom action that has already been reviewed cannot be edited or deleted. However, it can be disabled to remove it from the list of actionable custom actions. Please note that a custom action can only be edited or deleted while in draft status.
What is the role required to create a custom action?
Only operators with Tenant Admin roles can create a custom action.
I just created a custom action, and it is in a submitted state now. What does it mean?
This indicates that the team has received the request. Within 24 hours, it will be reviewed for potential security and performance impacts, and subsequently approved or rejected.
